Environment Switcher
1. Overview
The Environment Switcher is a header control in the Developer Console that lets you choose which API environment you are working in: Sandbox, Staging, or Production. Your selection determines which applications, API credentials, and console data appear throughout the Developer Console.
1.1 What You Can Do
- Environment selection — Switch between Sandbox, Staging, and Production from the header.
- Visual awareness — Color-coded indicators help you identify the active environment at a glance.
- Scoped data — Apps, keys, and connected APIs load for the environment you select.
- Guided context — In-product messages explain what each environment is for.
1.2 Key Benefits
- Centralized control — Manage all environments from one console without signing out.
- Clear visibility — Header accent colors and confirmation banners reduce the risk of working in the wrong environment.
- Consistent experience — The same navigation and workflows apply across Sandbox, Staging, and Production.
- Safer operations — Environment-specific defaults (such as key expiry) support safer development and testing practices.
1.3 Who Should Use It
- Developers — Switch environments when building, testing, and validating integrations.
- Administrators — Confirm the correct environment before creating apps, generating keys, or managing Sandbox resources.
- Team leads — Ensure team members understand which environment they are working in before making changes.
2. Access and Prerequisites
To use the Environment Switcher:
- The environment switcher is available to all signed-in users.
- The switcher appears in the header on medium and larger screen sizes.
- Available environments depend on your account access. Environments you cannot use appear grayed out and cannot be selected.
2.1 Locating the Switcher
- Sign in to the Developer Console.
- After authentication, you are directed to the main dashboard.
- In the top-right area of the header, next to notifications and your profile, locate the environment control.
- The current environment appears as a colored pill button — for example, Sandbox, Staging, or Production.
2.2 Switching Environments
- Click the environment pill in the header (for example, Staging).
- A panel opens with three options: Sandbox, Staging, and Production.
- Click the environment you want to use.
- The console updates to show data for the selected environment.
- Press Escape or click outside the panel to close it without changing environments.
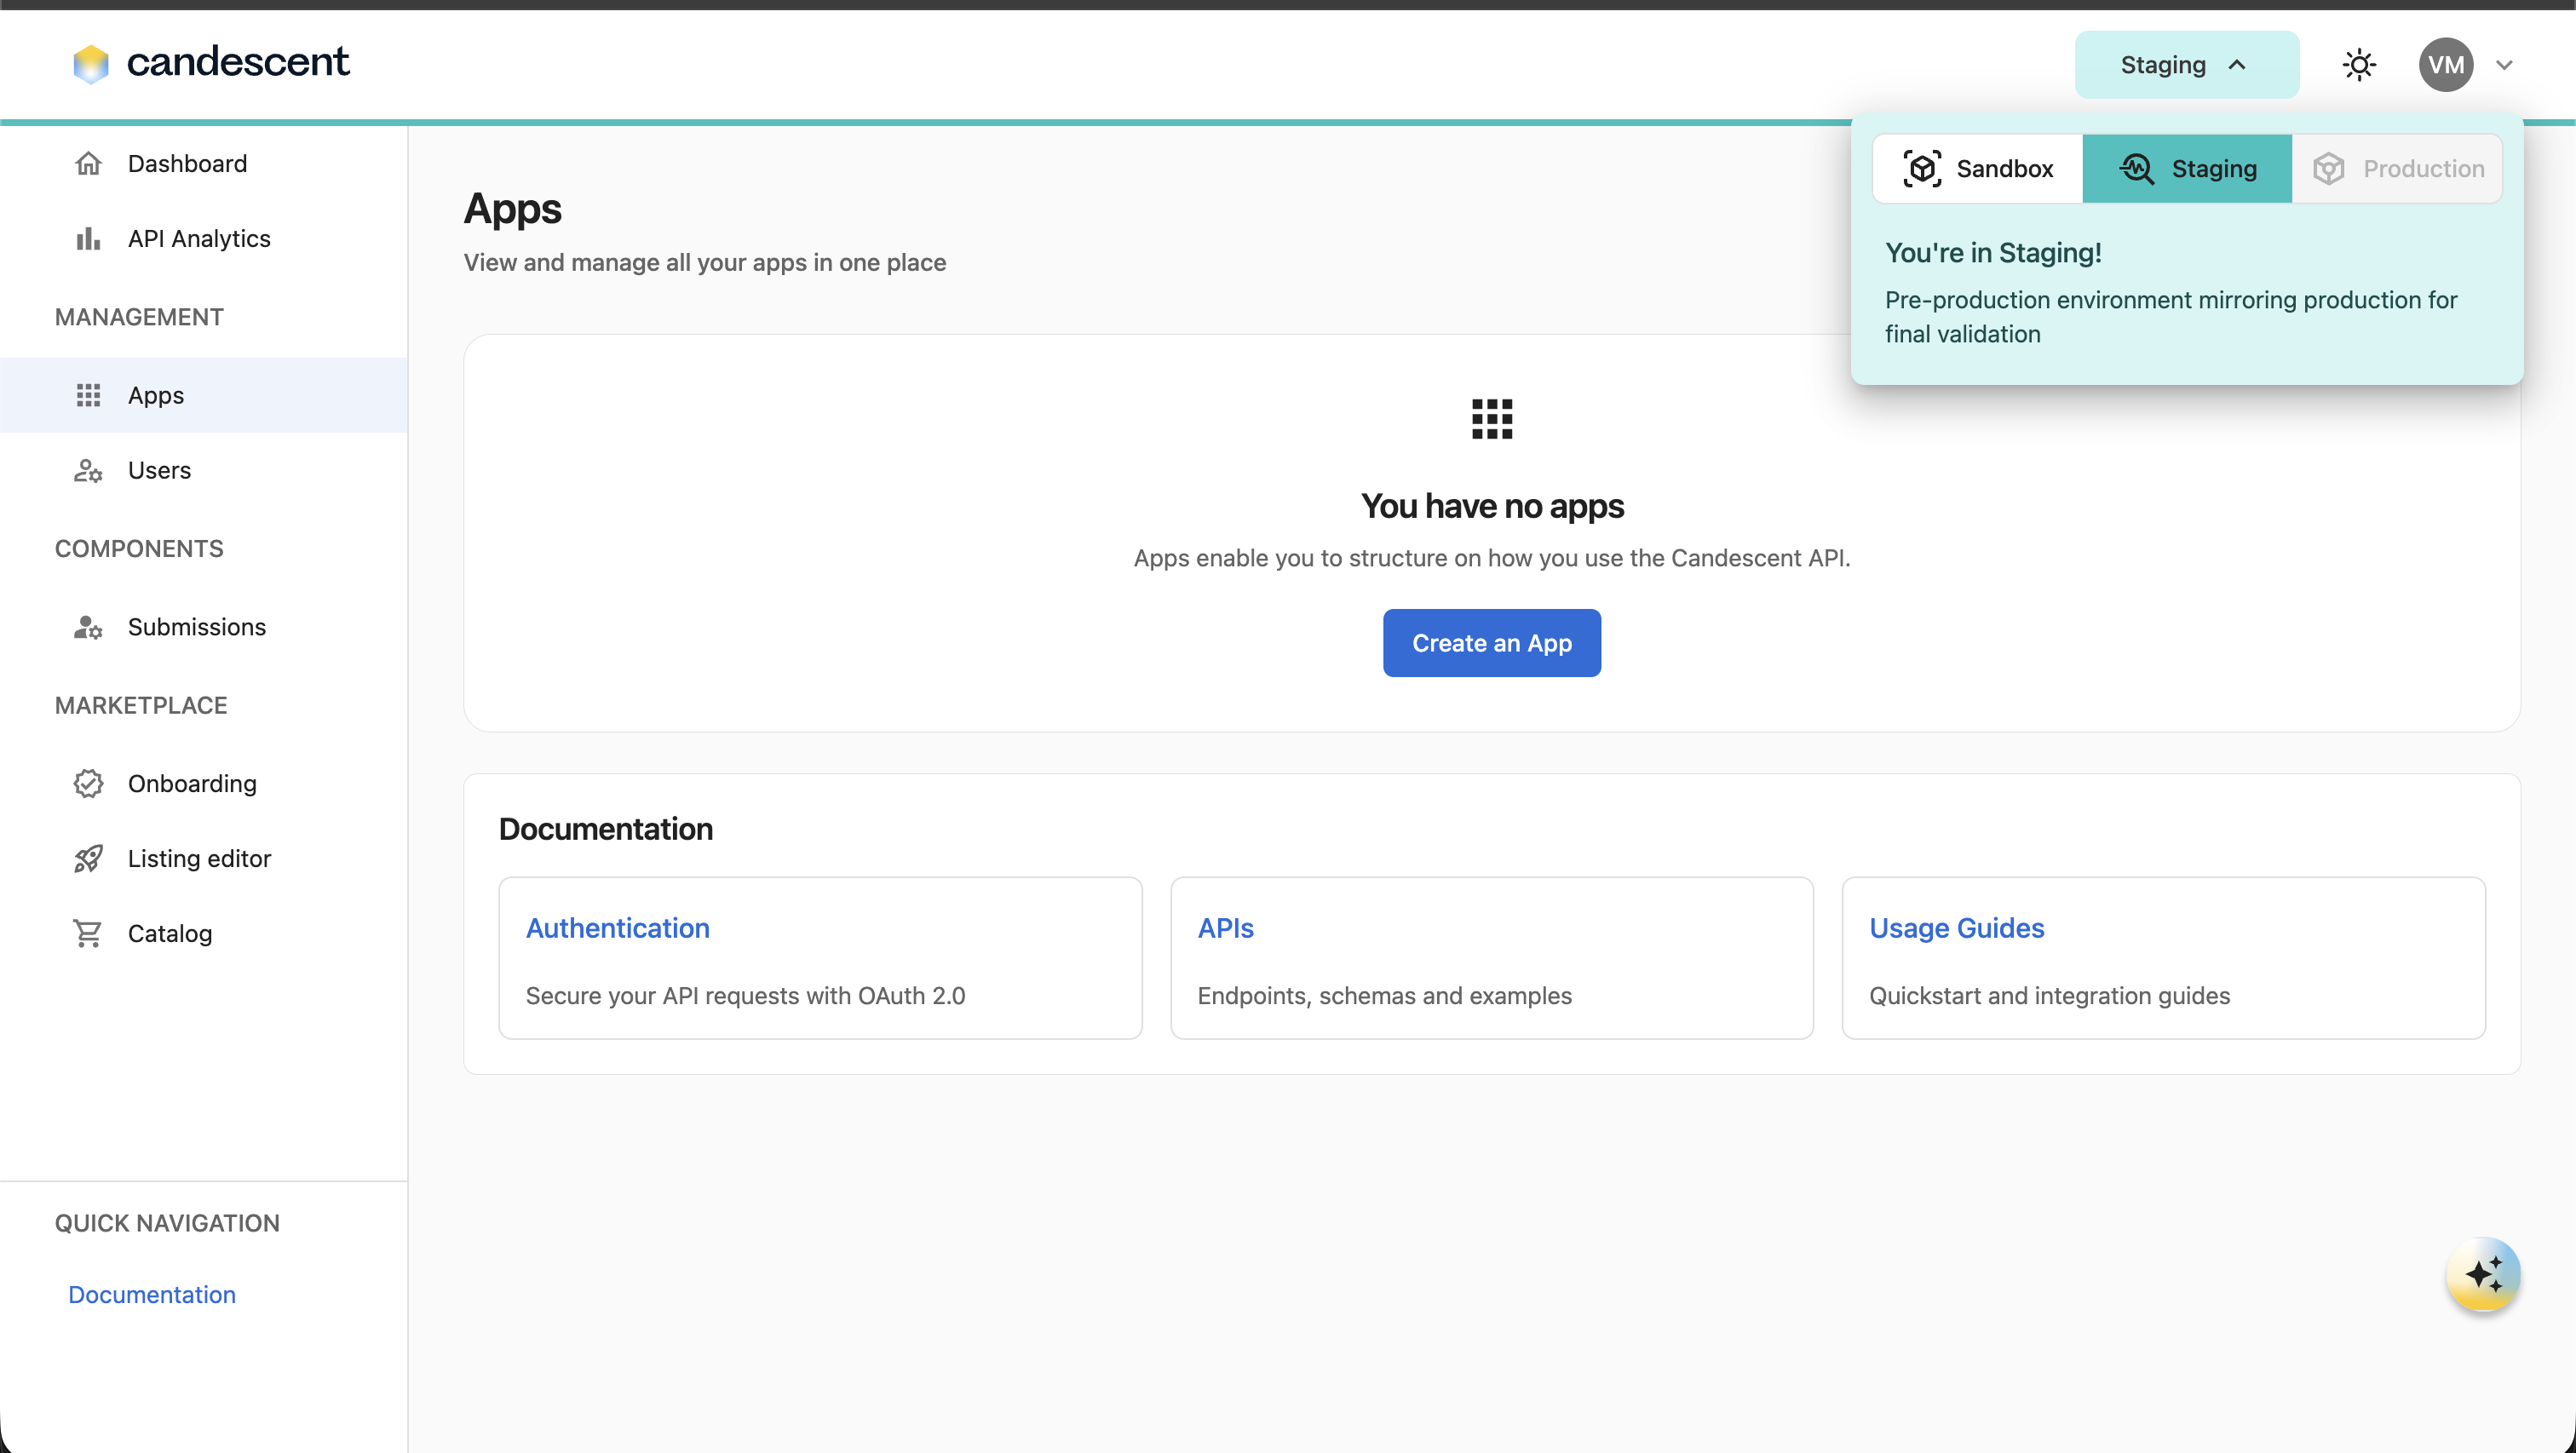
2.3 What You See in the Switcher
Each environment option includes an icon and label:
| Environment | Description |
|---|---|
| Sandbox | Safe environment for experimentation with mock data and APIs. |
| Staging | Pre-production environment that mirrors production for final validation. |
| Production | Live production system with real traffic and business impact. |
2.4 Understanding the Confirmation Banner
After you switch environments, a confirmation banner appears below the header.
The banner:
- Displays a short description of the active environment.
- Uses the same color theme as the selected environment.
- Auto-dismisses after a few seconds.
- Can be closed immediately using the Close (×) button.
- Reappears the next time you change environments.
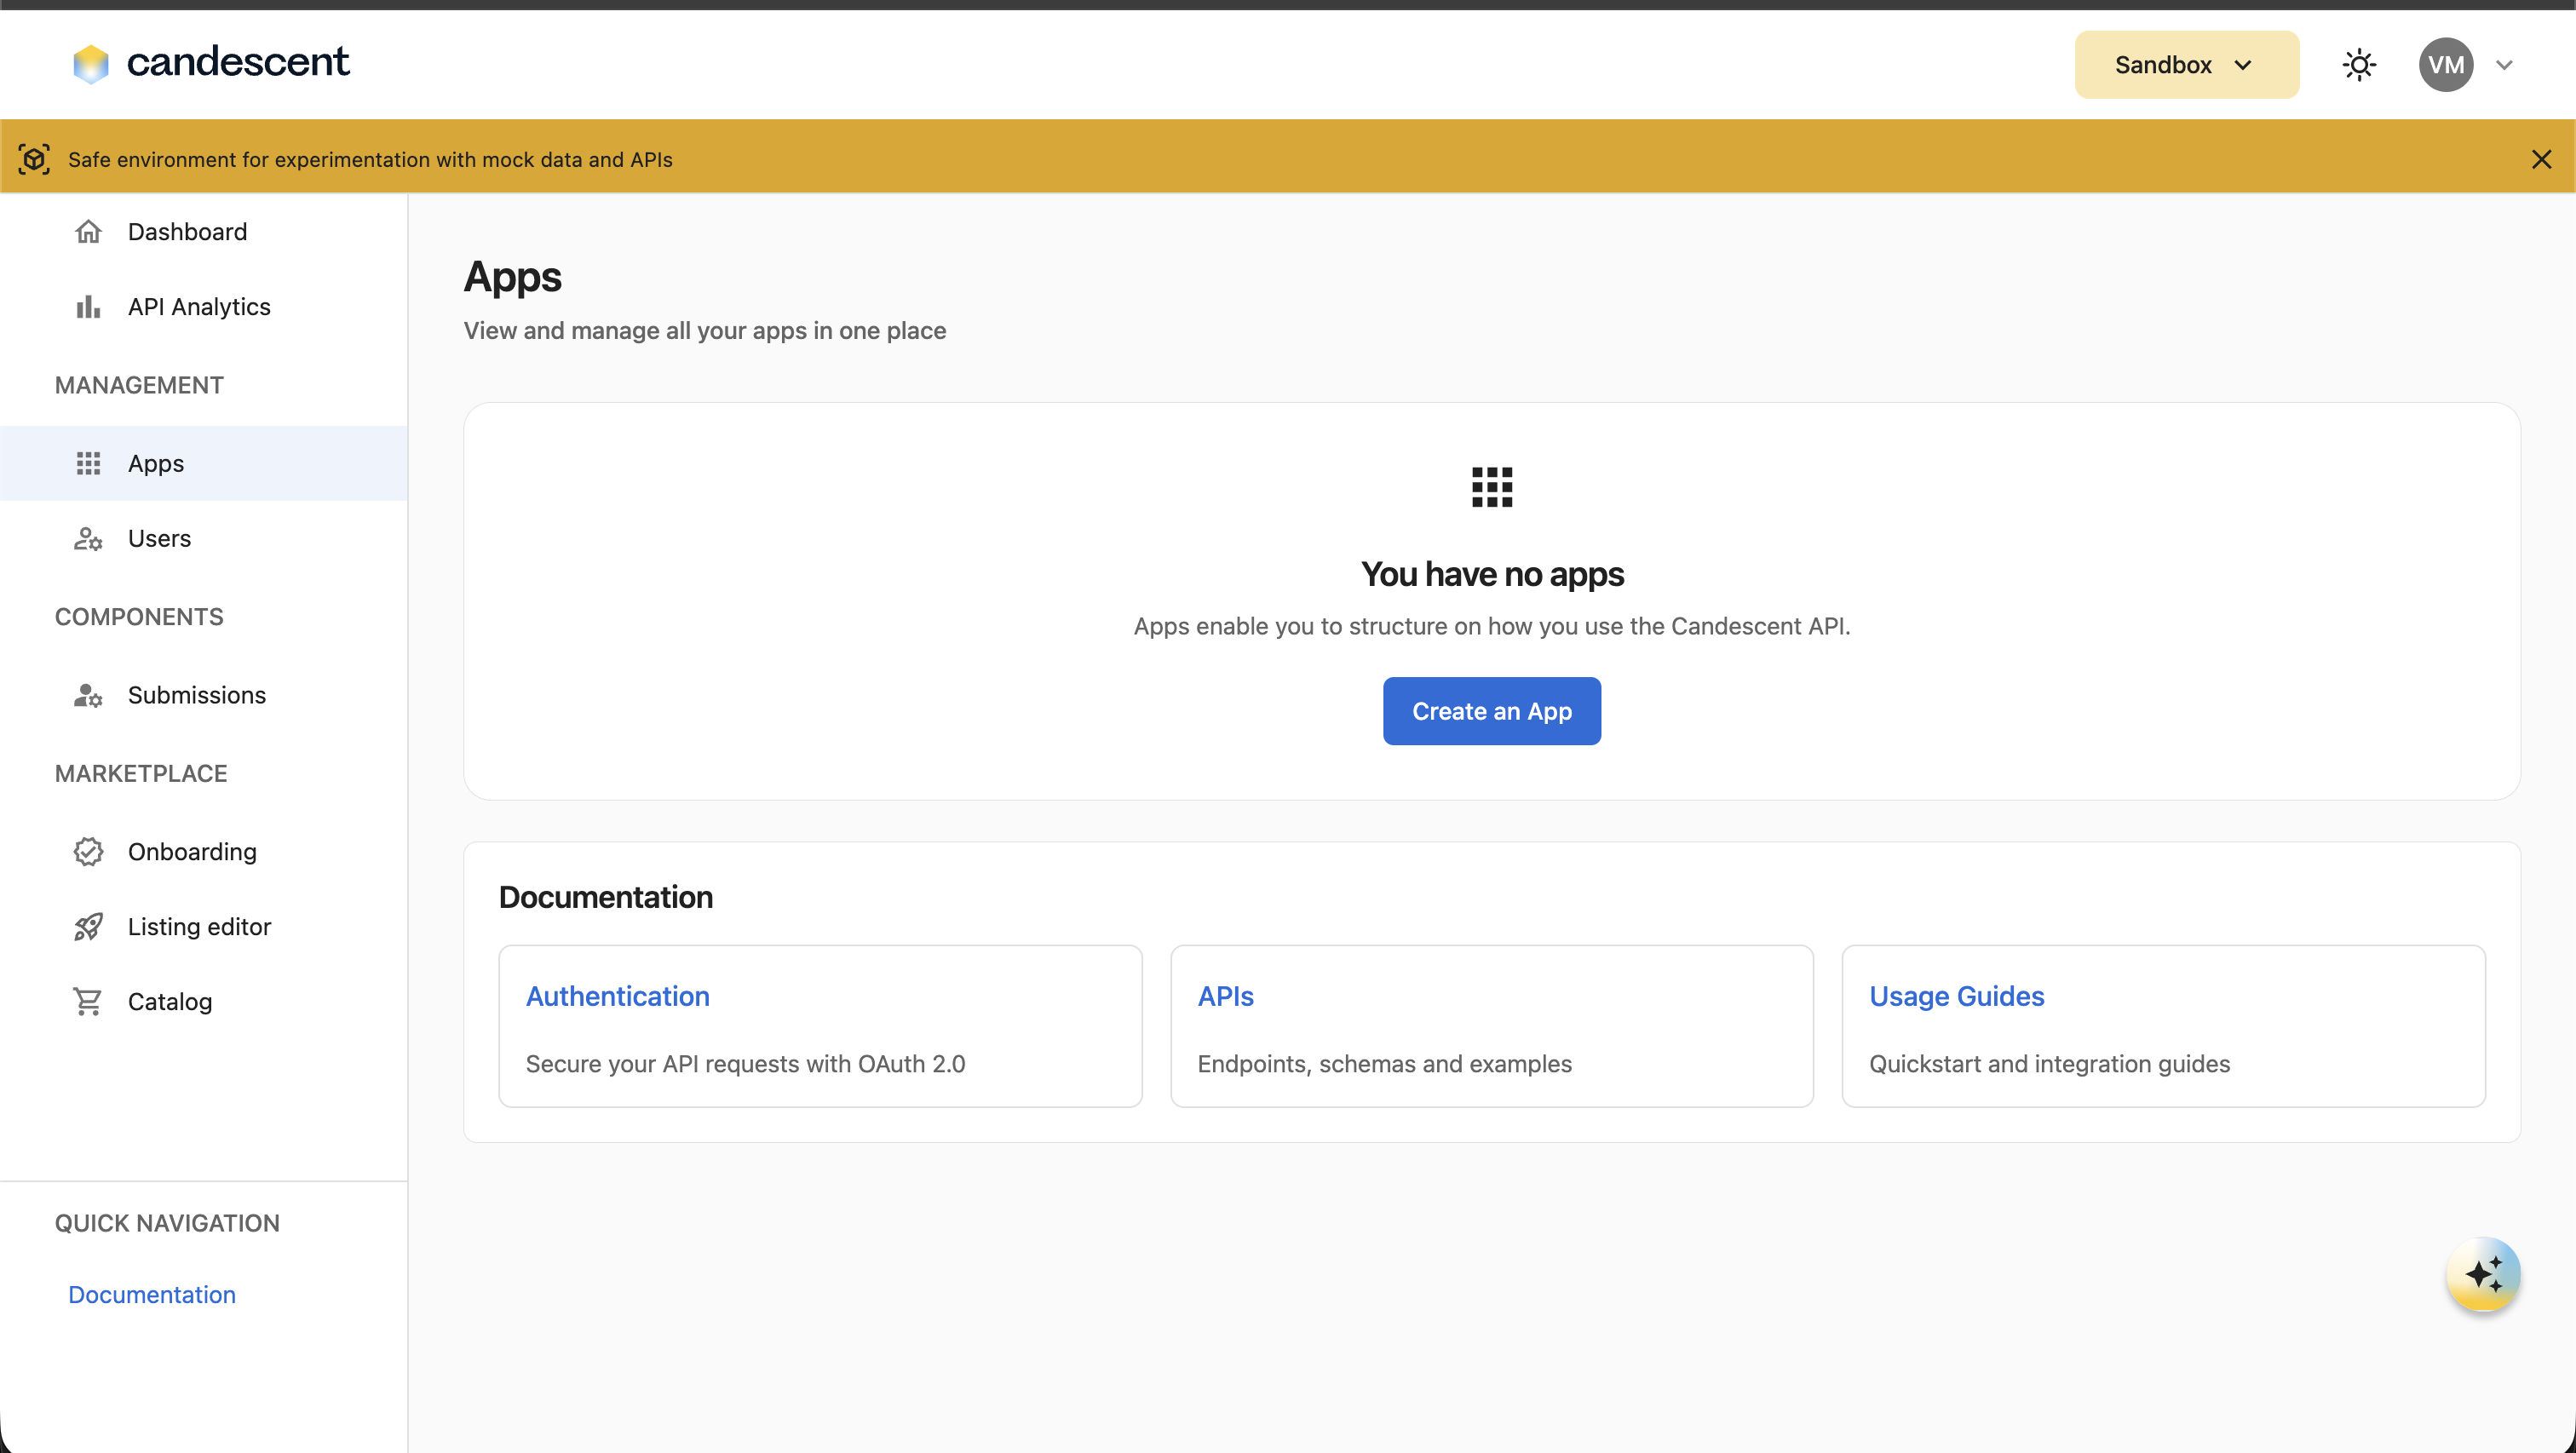
When an environment is active, the header also displays a colored accent border along the bottom edge so you can identify the current environment even when the switcher is closed.
Always verify the active environment before performing administrative or production-related actions.
3. Environment Overview
3.1 Sandbox
Sandbox is the safest environment for early development and experimentation.
- Use mock or sandbox-tier data and APIs.
- Default key expiry when creating or generating keys: 90 Days.
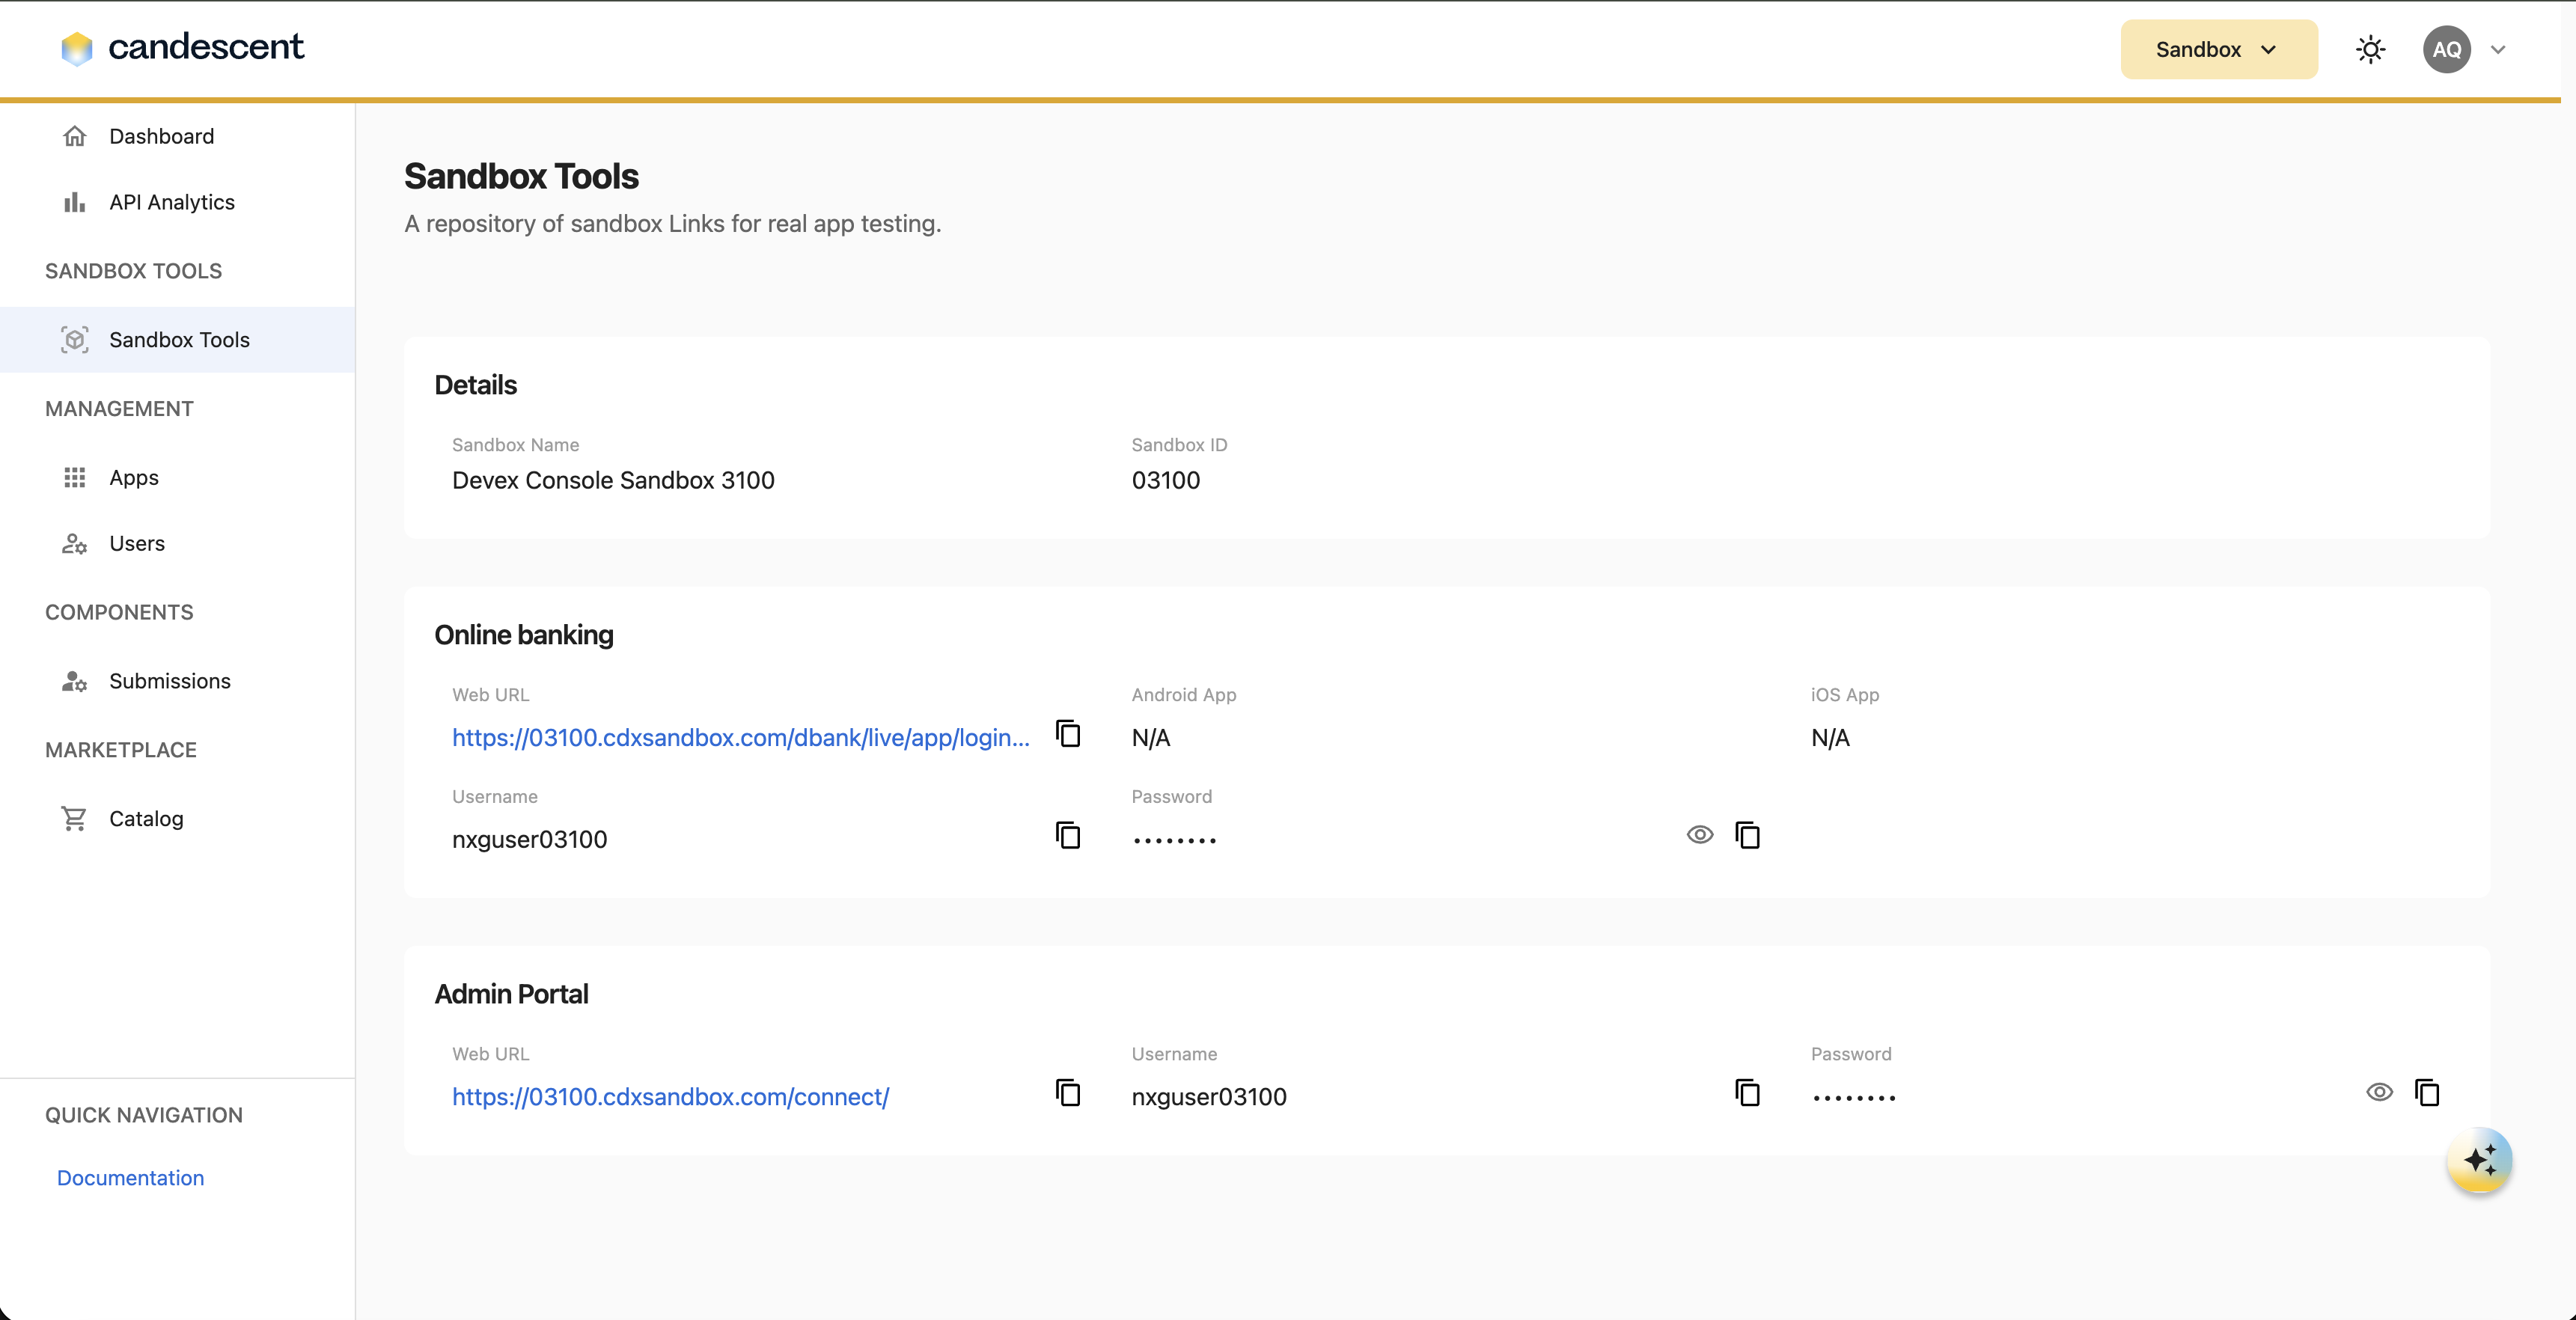
- Required for Sandbox Tools and Sandbox Settings in the sidebar.
Best for: Exploring APIs, building prototypes, and testing integrations without production impact.
Sandbox-only pages are not available in Staging or Production. If you navigate to a sandbox-only page while another environment is selected, you are redirected to the dashboard.
3.2 Staging
Staging mirrors production for final validation before go-live.
- Pre-production data and APIs.
- Default key expiry: 90 Days.
Best for: End-to-end testing, user acceptance testing (UAT), and validation before promoting to Production.
3.3 Production
Production is the live environment with real business impact.
- Real traffic and production APIs.
- Default key expiry: No Expiry.
You are working with live credentials. Double-check the header environment pill before creating, rotating, or revoking keys.
4. Common Use Cases
4.1 Viewing Apps in a Specific Environment
Scenario: You want to review applications and API keys in Staging before promoting changes to Production.
Steps:
- Sign in to the Developer Console.
- Click the environment pill in the header.
- Select Staging.
- Click Apps in the sidebar navigation.
- Review the applications and credentials shown for the Staging environment.
4.2 Creating an Application in the Right Environment
Scenario: You are setting up a new application and need credentials for a specific environment.
Steps:
- Select the target environment in the header (for example, Sandbox or Staging).
- Click Apps in the sidebar navigation.
- Click Create App.
- Complete the wizard steps and generate your initial API keys.
- Confirm the header still shows the environment you intended before closing the credentials dialog.
For Create App wizard steps and key generation, see Managing Applications and API Credentials.
4.3 Managing Multiple Environments
Scenario: You need separate API keys for Sandbox, Staging, and Production.
Steps:
- Switch to Sandbox in the header and create or manage apps and keys for development.
- Switch to Staging and repeat for pre-production validation.
- Switch to Production only when you are ready for live credentials.
- Document which keys belong to which environment.
- Store keys securely in environment-specific configuration.
- Never mix keys between environments.
- Rotate keys independently per environment, as needed.
4.4 Using Sandbox Tools
Scenario: You need access to sandbox-specific tools and admin settings.
Steps:
- Click the environment pill in the header.
- Select Sandbox.
- In the sidebar, open Sandbox Tools or Sandbox Settings (when available for your role).
- Complete your sandbox workflow.
5. What Changes When You Switch
Switching environments updates the data shown across the Developer Console.
| Area | What updates |
|---|---|
| Apps | Application list and details for the selected environment. |
| API credentials | Keys, expiry defaults, and lifecycle actions for the active environment. |
| Dashboard | Recently accessed apps and environment indicators. |
| Connected APIs | APIs linked to apps in the current environment. |
| Sidebar | Sandbox-only navigation items appear or disappear. |
| Support | Support context includes your selected environment. |
Always confirm the header environment before creating apps, generating keys, or performing lifecycle actions in Production.
Changing environments does not require you to sign out or log in again.
6. Best Practices
6.1 Environment Awareness
- Check the header pill before every significant action.
- Pay attention to the environment banner after switching.
- Use Sandbox for experimentation and Staging for validation before moving to Production.
- Document which applications and keys belong to each environment.
6.2 Security Best Practices
- Use different keys for different environments.
- Never share secret keys publicly or commit them to version control.
- Store keys in secure environment variables or configuration files.
- Rotate keys regularly (recommended every 90 days in non-production environments).
- Revoke compromised keys immediately.
6.3 Team Collaboration
- Establish clear procedures for the environment each team member should use.
- Confirm environment context during code reviews and deployments.
- Maintain a shared record of environment-specific configurations.
7. Troubleshooting
| Issue | What it means | What to try |
|---|---|---|
| Environment option is grayed out | Your account does not have access to that environment. | Contact your organization administrator to request access. |
| Switch did not take effect | The environment change may not have completed. | Try again. Refresh the page. Sign in again if needed. |
| Apps list is empty after switching | No apps exist in that environment for your organization. | Confirm the correct environment in the header. Create a new app if needed. |
| Sandbox Tools missing | Sandbox is not selected, or your role does not include access. | Switch to Sandbox. Contact your administrator if access is required. |
| Redirected to dashboard | The page requires Sandbox, but another environment is active. | Switch to Sandbox, then navigate again. |
| Environment switcher not visible | You may be on a small screen or not signed in. | Sign in. Use a tablet or desktop viewport. |
Next Steps
Continue to Managing Applications and API Credentials to create apps and manage API credentials in your selected environment.